Redactar un Mensaje
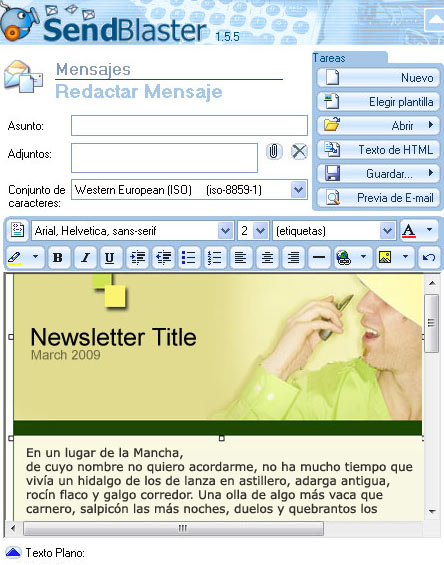
The compose message window allows you to create the message to be sent to a distribution list.
Message composing is achieved just like in any standard e-mail client: type the message Subject, insert any needed Attachments*, type the message text. In case the text needs special alphabets (non-Latin based), you will have to first set the Encoding (default encoding can be modified in the Fields and appearance window).
descarga el software gratuito de correo masivo y email masivos
Note: The encoding for the email message must be specified before typing the email in order to get the correct results. Failing to set encoding prior to email text typing may result in unreadable text.
The page shows two text areas:
- In the main area, where the long toolbar is placed, you can insert formatted text to generate an HTML-style message. You can also insert images and links, and you can check (and modify) the HTML code automatically generated by clicking, at any time, on the Show code button in the upper bar.
- In the Plain text area, you can type the message text in the plain text format. Some recipients may not be able to display messages in the HTML format, therefore it’s important to provide an alternative format for the contents, without any images and/or links. Plain text can be automatically generated starting from the formatted text by clicking on the Text from HTML button when finished typing the message.
To send customized messages (as opposed to generalized messages), in the message subject line and body (both in the HTML section and in the plain text section) you can insert Tags. Each tag is actually a field reference: when the message is sent, the tag is replaced by value read from the recipients text in the specified field. For instance, if the list includes a “BusinessName” field and an “Address” field (field names can be modified), by typing in the message body a text like:
Messrs. #businessname#
#address#
the recipients will receive a customized message like (example):
Messrs. The Coca Cola Company
Atlanta, GA
Since field names can be modified, it is also possible to use “fix” tags (field name independent tags) that refer to the field number (#1# #2#, and so on up to #10#). Field numbers can be found in the Fields and appearance window. Three special tags are also provided: #listname# which is replaced by the name of the list to which the message is sent; #emailmanagement# replaced by the e-mail address to which Subscriptions/Unsubscriptions are sent (this will allow recipients to easily remove their address from the list); and #systemdate# which is replaced with current date, formatted according to Windows’ settings.
How to create an Unsubscribe link
SendBlaster can manage distribution lists by downloading messages from a dedicated e-mail address, different for each list (Manage subscriptions). Therefore by using tags it’s simple to include in the HTML code an unsubscribe link:
<a href=”mailto:#emailmanagement#
?Subject=Unsubscribe”>Remove</a>This HTML code can be included in the HTML message by clicking on Show Code, or can be inserted as a link by using the Link button in the format toolbar (in which case the value
mailto:#emailmanagement#
?Subject=Unsubscribe
will have to be specified in the link window and, once the link is created, the text “Remove” (or similar) can be typed to replace the text shown).
The edited message can be saved in the .eml format (compatible with most e-mail clients) by clicking on the Save button.
To create a new message you can start from scratch (with the New or Choose template buttons) or, using the Open button, open a previously saved message:
- Import an .eml file (for instance, created with Outlook) with Open / Open .eml file
- Load a message previously sent with Open / Open e-mail from History
- Import a formatted text from an HTML page from the local hard disk, including images, with Open / Import HTML from file
- Import plain text with Open / Import plain text from external file
The button Text from HTML allows you to extract plain text from the formatted HTML text. It is therefore advisable to use it after having finished composing the message.
Before sending the message, it is possible (and strongly suggested) to verify how the message will be shown in e-mail clients, by using the E-mail preview button.


